

Chicken Kiev Oven Recipe: An Exquisite Delight For Your Palate
Chicken Kiev is a classic dish that combines tender chicken with a flavorful garlic-herb butter filling, creating a burst of flavors in every bite. The dish originated in Ukraine and quickly gained popularity worldwide due to its succulent taste and elegant presentation. In this comprehensive guide, we will delve into every aspect of creating a perfect Chicken Kiev using an oven, unveiling the food science behind it, discussing culinary details, providing tips and variations, and guiding you through the process of selecting, cleaning, and preparing ingredients. So, put your apron on, get ready to embark on this culinary adventure, and let’s explore the world of Chicken Kiev!
Food Science: The Science Behind the Perfect Chicken Kiev
Before we dive into the practical steps, it’s essential to understand the science behind achieving a tender and juicy Chicken Kiev. This knowledge will help you grasp the reasoning behind specific techniques and ensure excellent results every time you create this delectable dish.
Brining: The Secret to Juicy Chicken
Brining the chicken breast is a crucial step in the preparation process. Brining involves soaking the chicken in a mixture of water, salt, and optionally other flavor-enhancing ingredients. This process helps retain moisture in the meat and ensures a juicy and tender texture in the final dish. The salt in the brine solution alters the protein structure in the chicken, allowing it to retain more moisture during cooking.


Butterfly Cut: Creating a Pocket of Flavor
To achieve that signature burst of flavors in Chicken Kiev, it’s essential to butterfly the chicken breast. This technique involves cutting the chicken breast horizontally, creating a pocket that can be filled with the herb butter mixture. The butterfly cut ensures an even distribution of the flavors throughout the chicken and facilitates the cooking process.
The Importance of Resting: Letting the Flavors Settle In
After cooking Chicken Kiev, it’s crucial to allow it to rest for a few minutes. This step allows the flavors to settle, and the residual heat redistributes throughout the chicken. Resting also helps the butter filling to set slightly, preventing any drips when slicing into the succulent chicken breast.
Culinary Details: Selecting the Perfect Ingredients
Creating an exceptional Chicken Kiev starts with selecting the finest ingredients. Each component plays a crucial role in achieving the desired flavors and textures. Let’s dive into the specifics of choosing the perfect chicken, butter, and herbs for this sumptuous dish:
1. Chicken Breast: Tender and Succulent
When selecting chicken breasts, aim for ones that are plump, firm, and free of any bruises or blemishes. Opt for locally sourced or organic chicken if possible, as it often possesses superior tenderness and flavor. Additionally, choose chicken breasts that are roughly the same size to ensure even cooking.
2. Butter: Creamy and Flavorful
Butter is the star of the show here, contributing an indulgent creaminess and rich flavors to the dish. Use unsalted butter to have control over the sodium levels in your recipe. Selecting high-quality butter with a rich and creamy texture enhances the overall taste of your Chicken Kiev.
3. Fresh Herbs: Elevating the Aroma
Fresh herbs are an essential component in the herb butter filling, adding a burst of fragrance and depth to the dish. Popular choices include parsley, dill, basil, and tarragon. Obtain fresh herbs from local markets or grow them in your very own herb garden to ensure optimum freshness and aroma.
Cleaning and Preparation: The Path to Culinary Excellence
To ensure the utmost food safety and uphold the highest culinary standards, proper cleaning and preparation techniques are paramount. Follow these steps diligently to create safe and flavorful Chicken Kiev:
1. Thoroughly Rinse the Chicken
Before any preparation, gently rinse the chicken breasts under cool running water to remove any residual bacteria. Pat them dry using paper towels and place them on a clean surface.
2. Butterfly the Chicken Breast
To butterfly the chicken breast, lay it flat on a cutting board. Using a sharp knife parallel to the cutting board, carefully slice the chicken breast horizontally, starting from the thicker edge and stopping just short of cutting it into two separate pieces. Open the breast like a book, revealing a pocket for the flavorful filling.
3. Season the Chicken
Sprinkle both sides of the butterflied chicken breast with a pinch of salt and freshly ground black pepper. This light seasoning will enhance the overall flavors of the dish.
Tips and Variations: Elevating Your Chicken Kiev Experience
While the classic Chicken Kiev recipe is exquisite on its own, here are some tips and variations to take your culinary creation to the next level:
1. Add a Citrus Zing
For a refreshing twist, incorporate some lemon or orange zest into the herb butter filling. This addition will impart a delightful citrus zing, balancing the richness of the butter and enhancing the flavors.
2. Breadcrumbs for Extra Crunch
To add a satisfying crunch to your Chicken Kiev, coat the butterflied chicken breast in breadcrumbs before baking. This variation introduces an additional texture that will enthrall your taste buds.
3. Experiment with Herb Combinations
While parsley, dill, basil, and tarragon are the traditional herbs used in Chicken Kiev, don’t hesitate to experiment with different combinations. Substitute or add herbs like rosemary, chives, or thyme to create your own unique flavor profile.
4. Cheese Lovers Unite
For cheese enthusiasts, consider incorporating a small amount of grated cheese into the herb butter filling. Gruyere, mozzarella, or parmesan can lend a delightful creaminess and a mild tang that elevates the dish to new heights.
Doneness Check: Cooking Your Chicken Kiev to Perfection
To ensure your Chicken Kiev turns out perfectly cooked, follow these guidelines for checking its doneness:
1. Visual Evaluation
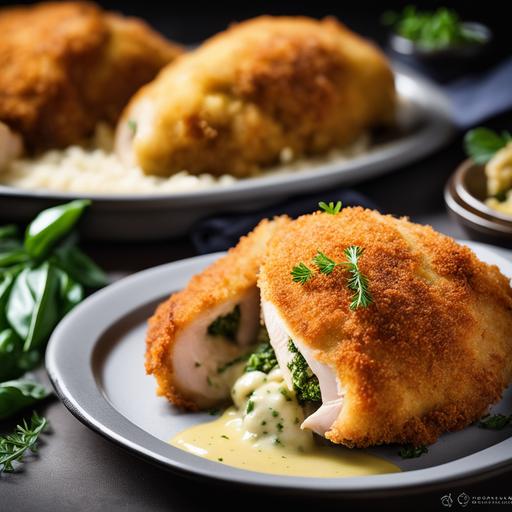
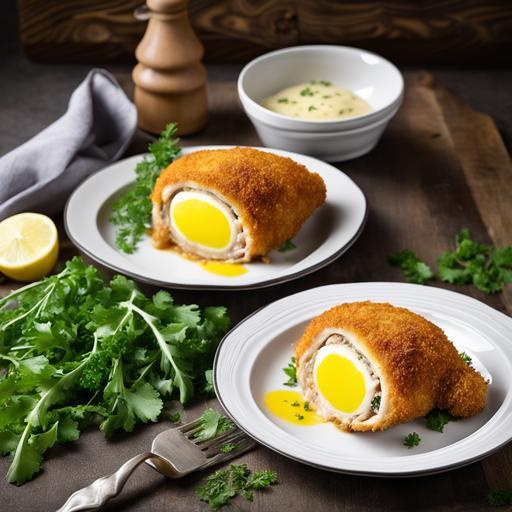
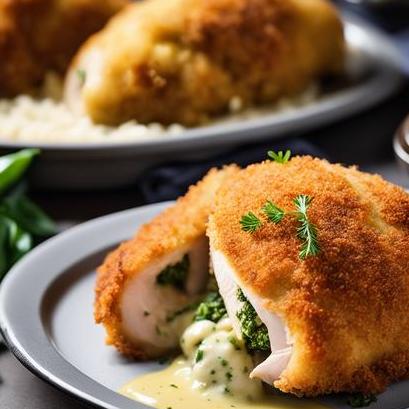
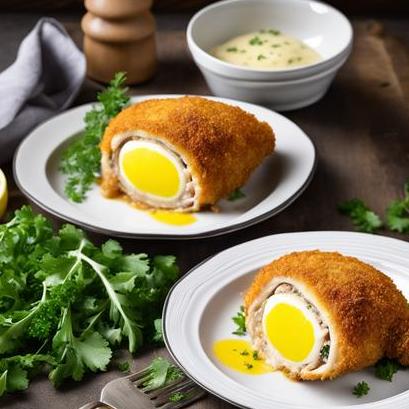
The visual appearance of the Chicken Kiev is a good indicator of doneness. The chicken should turn slightly golden brown on the outside, with the butter filling melting and oozing out slightly from the incisions. The breadcrumbs, if used, should be crisp and golden.
2. Internal Temperature
Using a meat thermometer, insert it into the thickest part of the chicken breast without touching bone. The ideal internal temperature for chicken is 165°F (74°C). Achieving this temperature ensures the chicken is cooked through while remaining tender and moist.
3. Knife Test
You can also perform a knife test to check the doneness. Insert a slim knife through the thickest part of the chicken breast, and if the juices run clear and the meat is white with no signs of pinkness, the chicken is cooked.
Recipe: The Ultimate Chicken Kiev Oven Recipe
Now that we have explored the ins and outs of Chicken Kiev, it’s time to unveil the ultimate recipe that will bring this remarkable dish to life in your oven. Follow these step-by-step instructions and savor the flavors of a traditional Chicken Kiev:
Ingredients:
-
4 chicken breasts, boneless and skinless
-
8 tablespoons unsalted butter, softened
-
2 tablespoons fresh parsley, finely chopped
-
2 tablespoons fresh dill, finely chopped
-
2 tablespoons fresh basil, finely chopped
-
2 tablespoons fresh tarragon, finely chopped
-
Salt and freshly ground black pepper to taste
-
1 cup bread crumbs (optional)
-
2 tablespoons olive oil for brushing
-
Lemon wedges and fresh herbs for garnish
Instructions:
-
Preheat your oven to 400°F (200°C).
-
In a bowl, combine the softened butter, parsley, dill, basil, and tarragon. Mix well until all ingredients are uniformly incorporated.
-
Butterfly each chicken breast as described earlier, creating pockets for the herb butter filling.
-
Spread approximately 2 tablespoons of the herb butter mixture evenly inside each chicken breast pocket. Fold the chicken breast back together, ensuring that the butter mixture is enclosed.
-
Season both sides of the chicken breast with salt and freshly ground black pepper.
-
(Optional) If you desire an extra crunch, coat each chicken breast with bread crumbs by rolling them in the crumbs until evenly coated.
-
Place the chicken breasts on a baking sheet lined with parchment paper and drizzle them with olive oil.
-
Bake the chicken in the preheated oven for 25-30 minutes, or until the chicken is golden brown, and the internal temperature reaches 165°F (74°C).
-
Remove the chicken from the oven and let it rest for a few minutes before serving.
-
Garnish with fresh herbs and serve with lemon wedges for an added zest.
Avoiding the Pitfalls: Overcooking and Undercooking
In the realm of cooking, overcooking or undercooking can be disappointing setbacks. When preparing Chicken Kiev, it’s essential to avoid these pitfalls to maximize the dish’s potential. Here are a few precautions to take:
Overcooking: The Enemy of Tenderness
Overcooked Chicken Kiev tends to become dry and lacks the desired juiciness. To avoid this, closely monitor the cooking time and internal temperature. Remember that the chicken continues to cook slightly even after removal from the oven, so it’s better to slightly undercook it and let it rest, allowing the residual heat to finish the cooking process.
Undercooking: Safety First
While slightly undercooking the chicken breast is acceptable, extreme undercooking can pose health risks. Always ensure the internal temperature reaches a minimum of 165°F (74°C) to destroy any harmful bacteria. Use a meat thermometer for accurate temperature readings and perform the knife test to check for doneness.
In Conclusion
Congratulations! You are now armed with comprehensive knowledge on creating an exceptional Chicken Kiev using an oven. We explored the food science behind brining, butterfly cutting, and resting, and understand how these techniques contribute to achieving the best results. We also covered the culinary details, guiding you through the selection of chicken, butter, and herbs. The cleaning, preparation, and doneness checks ensure safe and delicious outcomes, while the tips, variations, and ultimate recipe add versatility and excitement to your culinary journey. Now, it’s time to put this knowledge into practice, have fun in the kitchen, and impress your friends and family with a perfectly cooked Chicken Kiev that will leave them asking for more. Happy cooking!
Sources
FAQS On Chicken Kiev Oven Recipe
What Is Chicken Kiev?
Chicken kiev is a Russian dish made from chicken breasts that are pounded, rolled around a flavored butter filling, and breaded before being baked or fried.
What Ingredients Do I Need To Make Chicken Kiev In The Oven?
You will need chicken breasts, butter, garlic, parsley, salt, pepper, breadcrumbs, and eggs.
How Do I Make The Butter Filling For Chicken Kiev?
To make the butter filling, mix softened butter, minced garlic, chopped parsley, salt, and pepper in a bowl. Roll the mixture into a log and chill in the fridge until firm.
What Temperature Should I Set My Oven To When Making Chicken Kiev?
Preheat your oven to 375°F (190°C) before baking chicken kiev.
How Long Should I Bake Chicken Kiev In The Oven?
Bake chicken kiev for about 25-30 minutes until the chicken is cooked through and golden brown. Use a meat thermometer to check the internal temperature of the chicken, which should register at 165°F (74°C).