

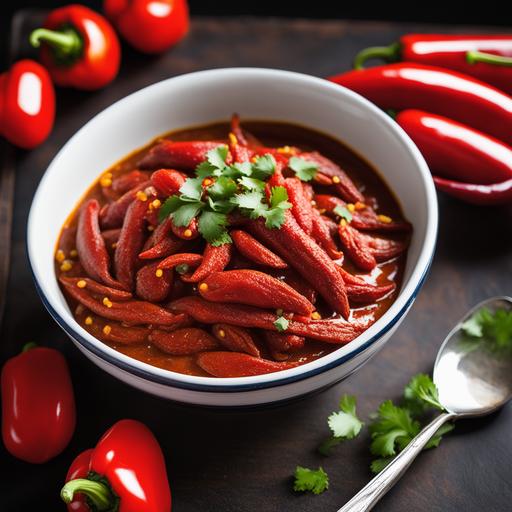
The Ultimate Chile Oven Recipe: A Culinary Delight For Spice Lovers!
When it comes to flavor-packed dishes, few recipes can match the versatility and fiery goodness of chile oven. This delightful dish offers a symphony of flavors that tantalize your taste buds with every bite. In this comprehensive guide, we will explore the world of chile oven, diving into the intricate food science, culinary details, selection, preparation, and tips. Whether you’re a culinary novice or an experienced chef, this article will equip you with all the knowledge you need to create the perfect chile oven dish.
The Science behind Chile Oven
To truly understand the art of chile oven, we must first explore the underlying food science. Chile peppers, known for their distinctive heat, owe their fiery nature to a compound called capsaicin. When capsaicin comes into contact with our taste buds, it triggers a series of reactions, resulting in the perception of heat.
Capsaicin, interestingly, is not water-soluble, which means consuming water after consuming a spicy chile can intensify the burning sensation. Dairy products, on the other hand, contain a protein called casein, which binds to capsaicin and helps alleviate the burn. So if you find your mouth on fire, a glass of milk or a spoonful of yogurt can be your spicy savior!
Choosing the Perfect Chile Peppers
Selecting the right chile peppers is crucial for achieving the ideal balance of heat and flavor in your chile oven. Here are a few popular varieties to consider:


1. Jalapeños:
Known for their moderate heat and vibrant flavor, jalapeños are an excellent choice for beginners. They offer a pleasant kick without overwhelming the palate.
2. Habaneros:
If you’re feeling adventurous and crave a fiery experience, habaneros are the way to go. These peppers are among the hottest, boasting fruity undertones and a searing heat that demands respect.
3. Poblanos:
Poblanos bring a mild to medium level of spiciness and are often employed in traditional Mexican cuisine. They have a rich, earthy flavor that adds depth to your chile oven.
Regardless of the variety you choose, look for fresh, firm peppers with shiny skins. Avoid any peppers that show signs of withering or mold.
Cleaning and Preparing Chile Peppers
Before diving into the preparation process, it’s essential to give your chile peppers a thorough cleaning. Start by rinsing them under cold water to remove any dirt or debris. Then, pat the peppers dry with a clean kitchen towel.
Next, it’s time to make a decision on whether to keep the seeds and membranes intact or remove them. The seeds and membranes contain a large portion of the capsaicin, which contributes to the heat level. If you prefer a milder dish, removing the seeds and membranes can help tame the spice. Conversely, if you’re a heat enthusiast, leave them intact for an extra kick.
To remove the seeds and membranes, slice off the tops of the peppers and make a lengthwise incision. Use a small knife or spoon to gently scrape out the seeds and pith, being cautious not to damage the flesh.
Tips and Tricks for the Perfect Chile Oven
Creating a mouthwatering chile oven dish is more than just assembling the ingredients. It requires finesse and attention to culinary details. Here are some essential tips to elevate your chile oven game:
1. Roasting the Chile Peppers:
To amplify the flavors and impart a smoky essence to your chile oven, it’s vital to roast the peppers before stuffing them. You can accomplish this by placing the peppers directly on a preheated grill or under the broiler. Rotate them occasionally until the skin starts blistering and blackening. The charred skin can then be easily peeled off, revealing tender, smoky flesh.
2. Filling the Chile Peppers:
When it comes to the filling, creativity knows no bounds. Classic options include a mixture of ground meat, rice, and spices, combined with a tangy tomato sauce. Vegetarian alternatives often feature a medley of vegetables, beans, and cheese. Remember to pack the filling tightly into the peppers to ensure they hold their shape during cooking.
3. Baking Temperature and Time:
A key element in achieving succulent chile oven is getting the baking temperature and time just right. Preheat your oven to 375°F (190°C) and place the stuffed peppers on a baking dish. This heat allows the flavors to meld together while maintaining the peppers’ structural integrity. Depending on the size and thickness of the peppers, expect a baking time of approximately 25-30 minutes.
4. Doneness Check:
Determining the doneness of your chile oven is crucial to avoid overcooking or undercooking the peppers. You can check this by inserting a skewer or knife into the thickest part of the pepper. If it slides in with minimal resistance, and the filling is hot throughout, your chile oven is ready to be devoured!
Variations and Creative Twists
While the classic chile oven recipe is undeniably fantastic, there’s always room for culinary experimentation. Here are some delightful variations and creative twists to satisfy your taste buds:
1. Stuffed Chile Rellenos Casserole:
If you’re short on time or prefer a twist on the traditional presentation, try making a chile rellenos casserole. The peppers are still the star, but they are chopped and mixed with a filling and baked in a delicious casserole form. It offers all the flavors of chile oven in a more convenient format.
2. Seafood Stuffed Peppers:
For seafood enthusiasts, why not create a seafood lover’s dream by stuffing your peppers with a decadent mixture of shrimp, crab, or lobster? The delicate flavors of the seafood perfectly complement the heat of the chile peppers.
3. Vegetarian Quinoa Stuffed Peppers:
Tapping into the superfood trend, create a healthy and nutritious version by using quinoa as the base for your filling. Combine cooked quinoa with sautéed vegetables, herbs, and spices for a vegetarian delight that will impress even the most discerning palate.
Overcooking and Undercooking – The Pitfalls to Avoid
While cooking chile oven is a culinary adventure, it’s essential to avoid common pitfalls that may result in disappointing outcomes. Overcooking or undercooking your peppers can significantly impact the texture and flavors. Here’s how to avoid these pitfalls:
1. Overcooking:
Overcooked chile oven can lead to mushy peppers and a lack of structural integrity. To prevent this, diligently monitor the baking time and remove the peppers from the oven as soon as they are cooked thoroughly. Remember, slightly firm peppers retain a satisfying bite.
2. Undercooking:
Undercooked chile oven can result in crunchy peppers and underdeveloped flavors. Ensure you bake the peppers for the recommended time and confirm doneness using the skewer or knife test mentioned earlier.
Taking the time to master these cooking techniques will ensure your chile oven receives rave reviews from friends and family.
The Ultimate Chile Oven Recipe
Now that you have a deep understanding of the intricacies involved in preparing chile oven, here is a delectable recipe to put your newfound knowledge into practice. Follow these steps for a memorable and mouthwatering culinary adventure:
Ingredients:
-
6 large chile peppers (Jalapeños or Poblanos based on your heat preference)
-
1 pound (450g) ground beef (or substitute with ground turkey or vegetarian protein)
-
1 cup cooked white rice
-
1 small onion, finely chopped
-
2 cloves garlic, minced
-
1 teaspoon ground cumin
-
1 teaspoon paprika
-
1 cup shredded cheese (cheddar, Monterey Jack, or Mexican blend)
-
1 cup tomato sauce
-
Salt and pepper to taste
Instructions:
-
Preheat your oven to 375°F (190°C). Line a baking dish with aluminum foil or lightly grease it to prevent sticking.
-
Roast the chile peppers over an open flame, grill, or broiler until the skin blackens and blisters. Place the roasted peppers in a bowl and cover it with plastic wrap. This will steam the peppers, making the skin easier to peel off.
-
In a skillet, brown the ground beef over medium heat until fully cooked. Remove from the heat and drain any excess fat.
-
In the same skillet, cook the onion and garlic until softened and fragrant. Add the ground cumin and paprika, stirring to coat the onion and garlic mixture.
-
In a large bowl, combine the cooked ground beef, cooked rice, onion and garlic mixture, and half of the shredded cheese. Season with salt and pepper to taste and mix well.
-
Carefully peel the skin off the roasted peppers and make a lengthwise incision to remove the seeds and membranes. Be cautious not to damage the flesh.
-
Gently stuff each pepper with the beef and rice mixture, ensuring they are packed tightly.
-
Arrange the stuffed chile peppers in the prepared baking dish and pour the tomato sauce over them. Sprinkle the remaining shredded cheese on top.
-
Place the baking dish in the preheated oven and bake for 25-30 minutes, or until the peppers are tender and the cheese is melted and golden.
-
Once cooked, remove the chile oven dish from the oven and allow it to cool for a few minutes before serving. Garnish with fresh cilantro leaves or a dollop of sour cream, if desired.
Conclusion
Congratulations! You have now embarked on a journey through the world of chile oven. Armed with an understanding of the food science, culinary details, selection, cleaning, preparation, and tips, you have the knowledge to create a tantalizing dish that will impress your friends and family. Remember, the key to a successful chile oven lies in balancing heat, flavor, and texture. So go ahead, channel your inner chef, and enjoy the mouthwatering flavors of this spicy delight!
Sources
FAQS On Chile Oven Recipe
What Type Of Chile Should I Use For The Oven Recipe?
The best chile to use for the oven recipe is poblano or Anaheim chile. These chiles have a mildly spicy flavor and are not too hot for most people’s taste buds.
Do I Need To Pre-cook The Chile Before Oven-roasting It?
Yes, you should pre-cook the chile before oven-roasting it to ensure that it cooks evenly and is soft and tender. One method of pre-cooking is to char the chile on a gas stovetop or under the broiler until the skin is blackened.
How Long Should I Roast The Chile In The Oven?
The length of roasting time for the chile in the oven will depend on the recipe and the size of the chile. Generally, the chile should be roasted for 25-30 minutes at 400°F until the skin is crispy and slightly blistered.
Can I Stuff The Roasted Chile With Any Type Of Filling?
Yes, you can stuff the roasted chile with a variety of fillings including cheese, meat, vegetables, or rice. Be creative and experiment with different combinations of fillings to find your favorite flavor.
Are Roasted Chiles Healthy To Eat?
Yes, roasted chiles are healthy to eat and are a good source of vitamins A and C. Chiles are also a low-calorie vegetable and can be included as part of a balanced diet. However, be aware that some people may have a sensitivity to spicy foods and should eat them in moderation.